How To Build An EM Pump
March 24, 2022 1:00 AM ‐ Ghost Hunting • Paranormal
This article is more than two years old.
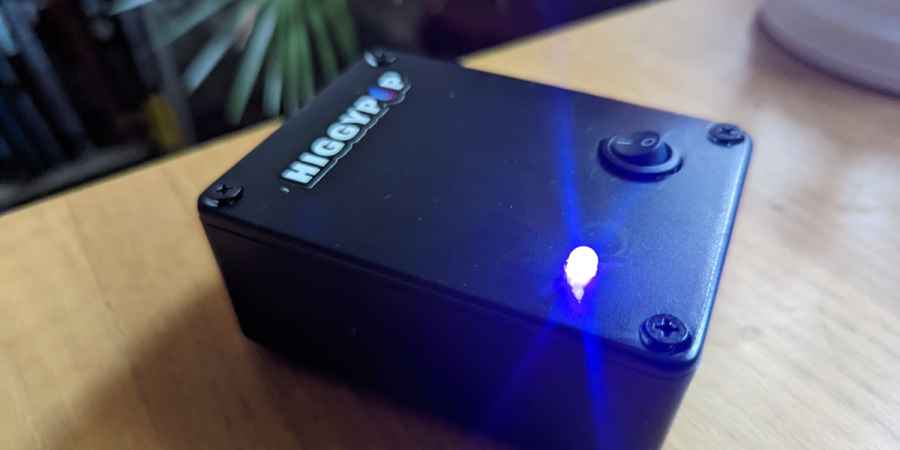
An EM Pump produces an electromagnetic field that ghosts and other supernatural entities are said to be able to feed on allowing them to manifest or communicate.
Like most ghost hunting gadgets, this devices isn't guaranteed to increase paranormal activity, but their creators claim that if there is a ghost present that wants to communicate, it can draw on the energy radiated by this device to do so.
The connection between ghosts and electromagnetism is based on the fact that the human brain uses tiny electronic impulses to send signals around our bodies. Some think that this synaptic energy can live on as a disembodied consciousness after death and can be detected be electromagnetic field meters.
If you want to experiment with an EM Pump, you'll need to fork out a bit of cash, they retail for around $40 to $60 dollars, despite the fact that they're actually pretty simple devices made from a handful of very cheap components.
In a recent video on the YouTube channel Paranormal Tedium, the channel's host. Rich, breaks down the inner-workings of an EM Pump. He explains what an EM Pump is, how they are supposed to work and whether they really do what they are supposed to.
Rich also talked about how cheap and easy it is to build your own EM Pump, even without any electronics experience. The rational paranormal researcher called his version of the device the "Pump-A-Nator".
The parts to build your own can be purchased for a fraction of the cost of buying an EM Pump and since the major components are self-adhesive they can easily be fitted in place.
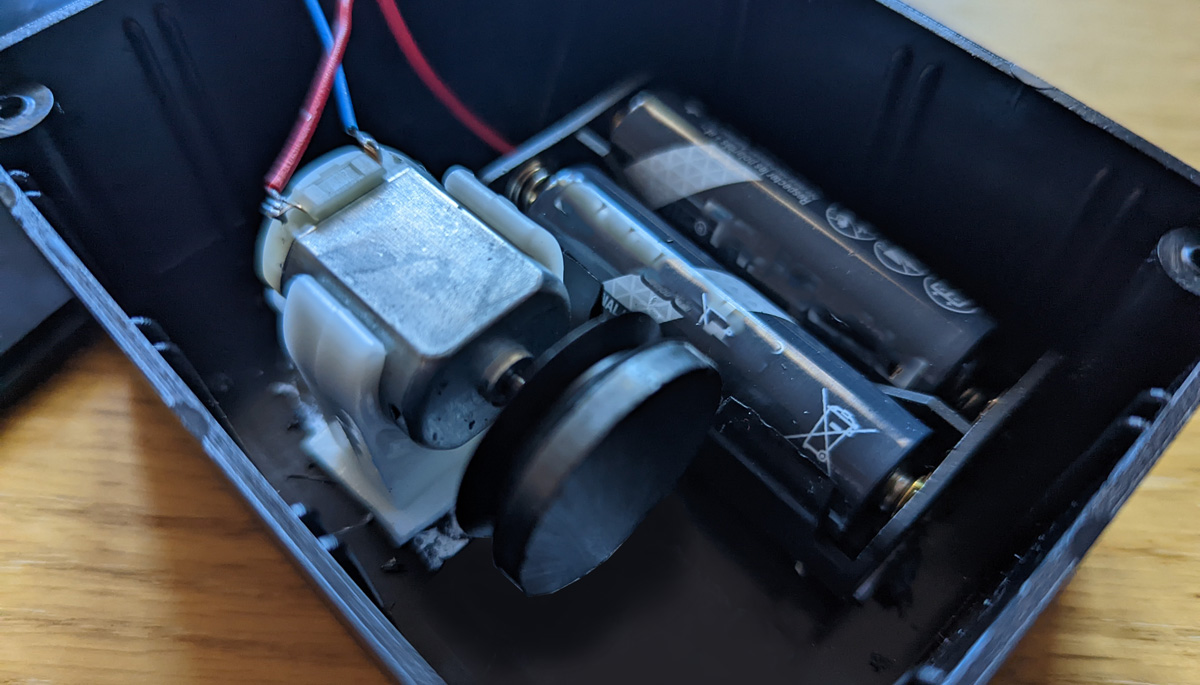
If you still want to experiment with a EM Pump after watching Rich's brutal tear down of the device, then you'll need a few components to put your own Pump-A-Nator together, including a case, a battery holder and the all important motor and magnet assembly.
Low-voltage DC motors are available with self-adhesive holders which means that this component can be pressed into place in the case. You'll then need to press the self-adhesive magnet on to the motor pulley wheel and push this on to the motor's axel.
You can then use glue or self-adhesive tape to fix the battery holder inside the case. Then, all you'll need to do is drill two holes in the top of the case, one for the LED power indicator to poke through and the other for the power switch.
Then you just need to connect it all together in parallel. So connect a wire from the positive terminal of the battery case to one side of the switch. Then from the other side of the switch to one terminal of the LED, and from this same terminal to one terminal of the motor.
Then connect a wire between the negative terminal on the battery terminal to the free terminal of the LED and from this terminal to the free terminal on the motor.
The only thing to really be aware of in this stage is that LEDs only allow current to flow through in one way, so be sure to connect the positive and negative to the correct sides of the LED.
Pump-A-Nator Components
Here's all the components you'll need to build your own EM pump.
1x Case
1x LED (5mm)
4x Rubber Feet
1x Switch
1x Wire
Related Content


Daily Horoscopes
Leo

You have sudden flashes of intuition and insight right now that can serve you well if you pay attention to them. You may have strange dreams or visions that come suddenly and leave just as quickly, so carry a notepad.... Read More


You May Also Like


