Haunted Escape: 'The Haunting Of Hadley Hall' Online Escape Room Walkthrough
This page is more than two years old.
A complete walkthrough with hints and solutions for all of the online puzzles and challenges you'll encounter in Haunted Escape's eerie online escape room, 'The Haunting Of Hadley Hall'.
The virtual experience is based on real ghost hunting techniques and gives player a dark supernatural mystery to solve, immerses them in forgotten secrets, devious plots and lingering negativity.
Escape rooms are real-world physical games where teams of players are locked inside of a room and must complete tasks and puzzles to escape. 'The Haunting Of Hadley Hall' is the latest of these games and invites players to enter the imposing former stately home, but in order to escape you'll have to solve a decades-old supernatural mystery.
You can check out the trailer for the game below and play for yourself at hauntedescape.co.uk. Or if you're stuck on one of the game's 16 supernaturally-themed tasks then keep scrolling for help, clues and if you still need it, the solutions.
⚠️ Warning: This is a complete walkthrough of the game including the solutions to all of its puzzle. There are major spoilers from this point on.
Introduction

Hadley Hall is a stately home in the small village of Ringwood on the edge of the Medway Forest. The present hall was built in 1898 for first baron and member of parliament William Hadley and his family. Having lost his two sons during the First World War, the hall was passed on after his death to his granddaughter, who lived there until she vanished without a trace in September 1942.
The hall was used during the Second World War as a secret regional communications hub. It is now owned by the Bridgart Corporation as a luxury hotel and wedding venue, famous for its restaurant since chef Mark Ryder pulled it back from the brink of closure after earning the hall a Michelin star in 2011, but ever since guest numbers have been declining due to an increase of reports of paranormal activity.
The hotel's manager, Ben Emerson, has called you and your team of ghost hunters in to get to the bottom of the haunting. With the hotel cleared of guests, you will be by yourselves locked down in Hadley Hall for one night.
At this early point in the game, the manager has given you a list of emergency contact numbers. This piece of paper will stay in your inventory until you need it later in the game.
Everything you are given is important to the game and has a use. Once you have used an item it will vanish from your inventory and does not need to be used again.
Reception
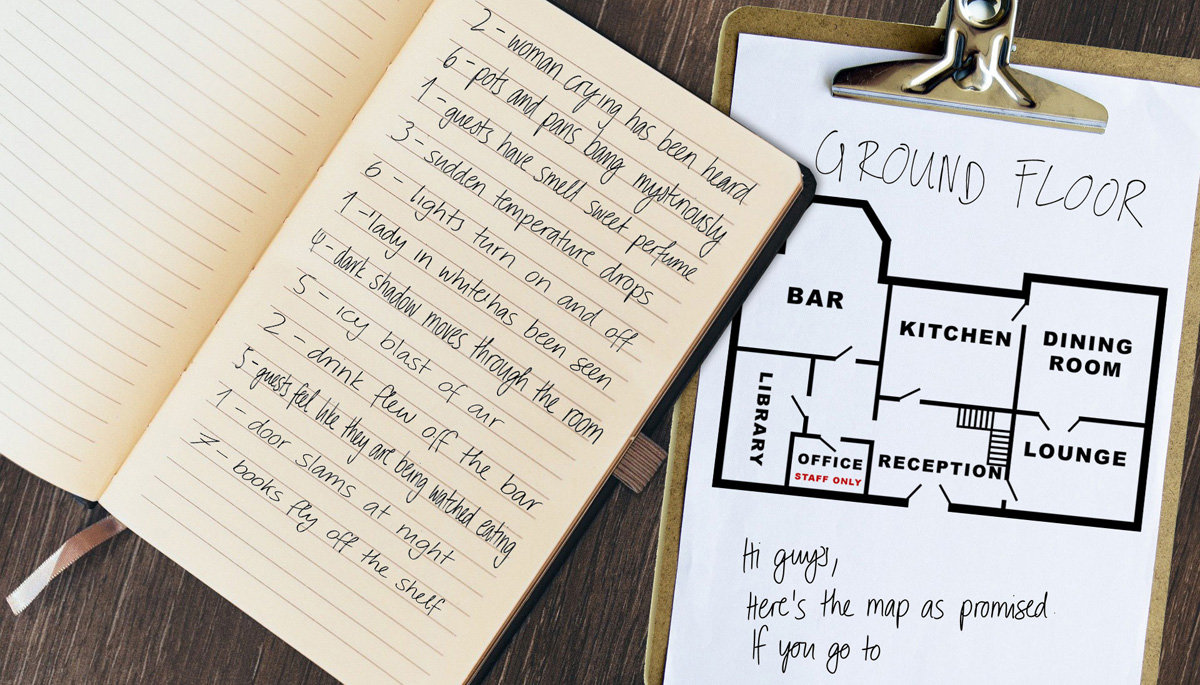
The manager has started writing you a note telling you where the most paranormally active room on the ground floor is, but he seems to have left in a hurry and hasn't finished. Luckily he's left his notes on the hauntings behind. He's used the building's fire alarm zones to keep track of where the spooky reports have occurred.
Your task in this first room is to work out where he intended you to go. The map shows your options, either he bar, kitchen, dining room, library, reception, lounge or an office.
To work out which of these rooms you need to visit you'll have to establish which has the most reported paranormal activity. You can do this by counting the number of times each zone is mentioned on the list of activity. The zone with the most paranormal activity listed is zone 1.
You'll next need to work out which room on the map corresponds with zone 1 by reading through the rest of the list.
In Zone 2 it's said that drinks have fallen off the bar, so we know that we can be eliminated the bar.
Zone 3 doesn't give us any clues.
Zone 4 requires a glance around the reception itself. A sign near the reception desk reads "fire point 4" so we can eliminate the reception.
In Zone 5 guests feel like they are being watched eating, so we can eliminate the dining room.
Zone 6 must be the kitchen because the list tells us that pots and pans bang mysteriously.
In Zone 7 books fly off the shelf, so this must be the library.
That leaves us with the lounge and the office. Since the office is marked on the map as "staff only" we can deduce that we need to go to the lounge. Simply type "lounge" into the answer box.
The lounge is zone 1 and has more ghostly goings on than any other room on the ground floor. That seems like a good place to start. As you're about to leave you notice a handy guide to sign language lying on the desk and throw it in your kit bag. This will be useful and will be available from this point on in your inventory.
Residents' Lounge
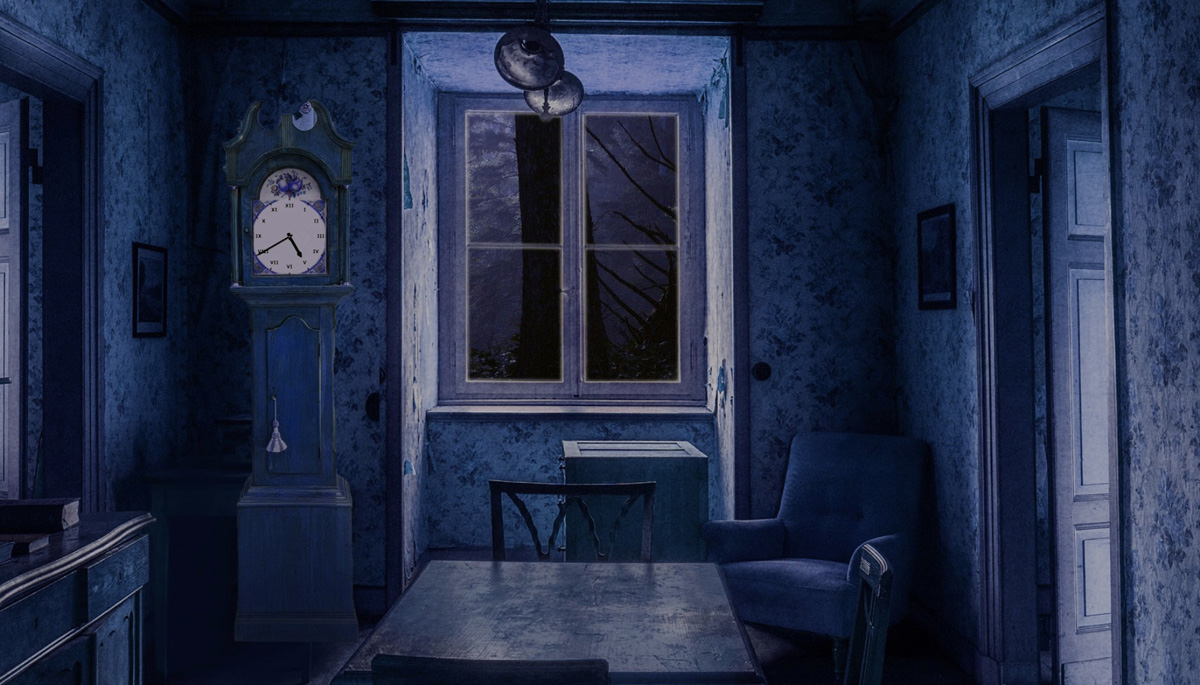
According to the manager's notes this cozy snug is the most paranormally active room on the ground floor of the hotel. The sweeping apparition of a lady in a flowing white dress has been seen here, the smell of a sweet perfume lingers from an unknown source and doors are said to slam in the dead of night. This seems like a good place to start. Your team call out to any spirits that might be present, you ask 'if there's someone here with us can you tell us who you are?'
This puzzle requires you to come up with a set of initials, but despite the room's active reputation, the room falls totally silent, not even the sound of a ticking clock can be heard. Silence is golden, but can signal something is a miss when it's unexpected. Look around the room, should it be so quiet?
This is the clue that points you towards a fairly simple clock face puzzle where 1 equals A, 2 equals B and so on. The clock has stopped on 5 and 8, which equals E and H.
After entering EH the mood instantly seems to change in the dark lounge and a sweet floral scent suddenly fills the air confirming the presence of a female spirit. Suddenly you hear a sound behind you and turn to investigate.
Advertisement ‐ Content Continues Below.
Residents' Lounge Radio
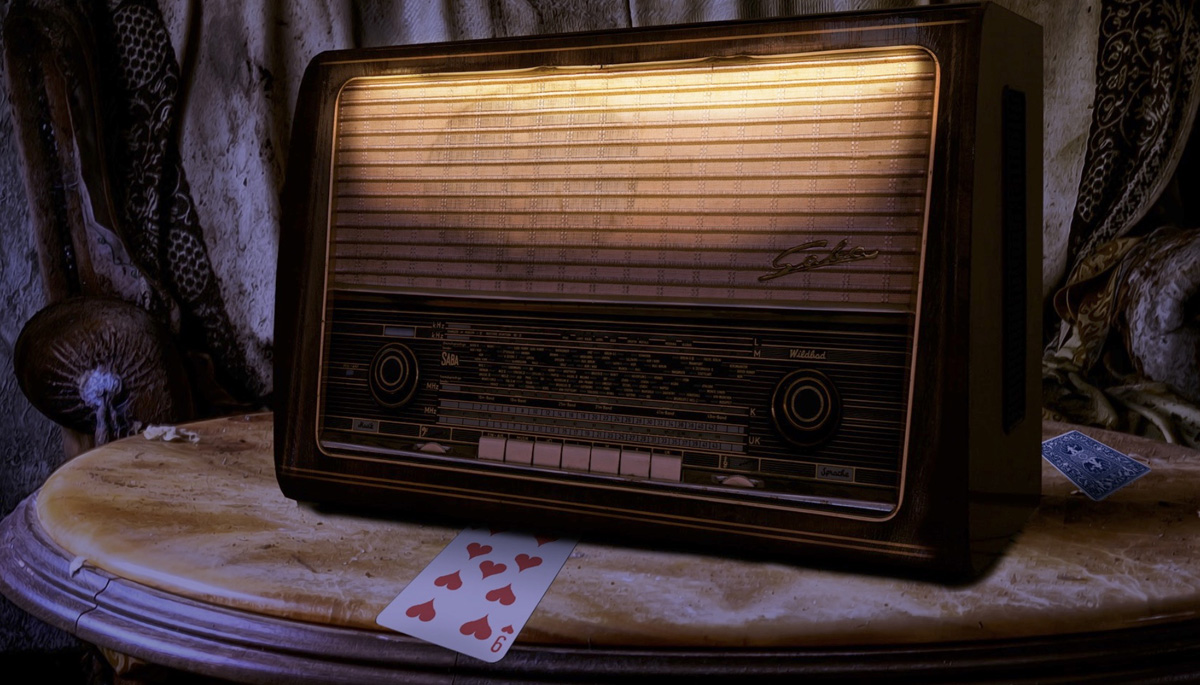
An old radio has sprung to life. It seems the female spirit is trying to make her presence known and is leading you to something, but the radio is just spewing out static. Perhaps the friendly spirit is giving you a clue what you should do to the radio.
Your aim here is to work out which frequency to tune the radio to. The big clue here is a playing card sticking out from under the radio as if it's been placed there. The suit and number of the card may help you tune the radio to a point on the FM band between 87 and 108Mhz.
We're looking at the nine of hearts, which obviously gives us a 9. Again using the alphabet as a code, H equates to 8. So this tells us it's either 89 or 98. Give both a try and you'll find that 89 is the golden number.
You tune the radio to 89.0 and listen. Through the static you hear a female voice whisper the name 'Elizabeth'. It seems the ghost that haunts the hotel has answered your question. You now know you are dealing with a female spirit named Elizabeth and the second initial H. As you think about what this new information might mean for your investigation, you see a dark shadow move past the doorway into the dining room, so you go to investigate.
Dining Room
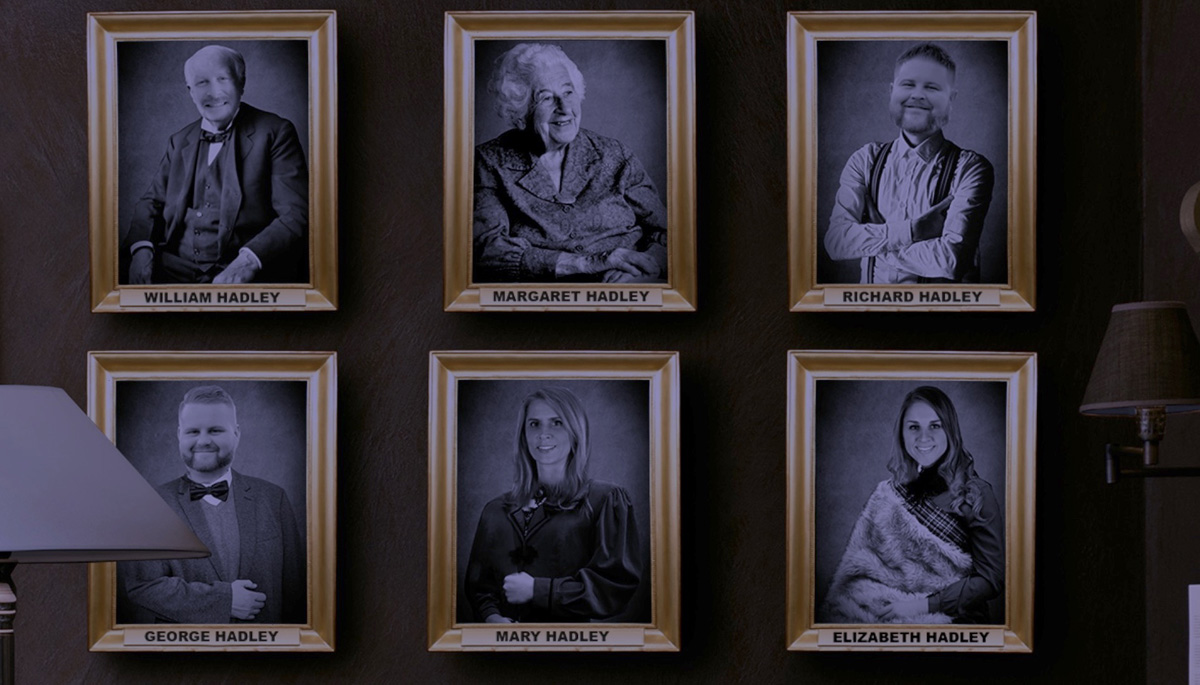
Six portraits hang on the gloomy dining room's wall which depict three generations of the Hadley family. In the photos are William Hadley MP and his wife Margaret, their two sons Richard and George along side his wife Mary, and their only grandchild.
This is a pretty simple one. You've already establish the first name of the spirit is Elizabeth, so you just have confirmed the full name of the female spirit and it is written right there under her portrait.
You just need to type in "Elizabeth Hadley". After you do you feel the hairs on the back of your neck stand on end, it's a chilling revelation and evidence that you are on the right track.
The young woman pictured is Elizabeth Hadley. You know from the history of the building that Elizabeth mysteriously vanished when she was 22, but you need to find out what caused her disappearance. You call out, 'Elizabeth, can you tell us what happened to you?' You start to feel a little strange and all of a sudden start to see flashes.
Dining Room Visions
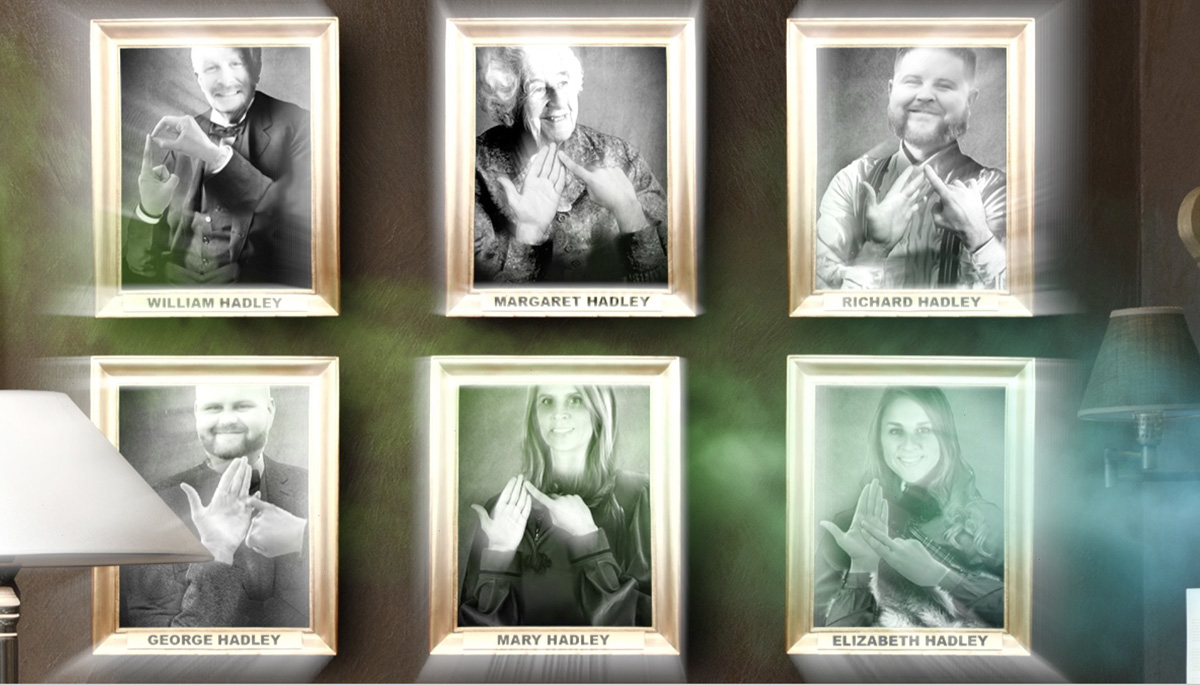
As you stare at the six portraits, they seem to change in front of your eyes. Is this a psychic vision at the hand of Elizabeth? She's trying to tell you what happened to her, how she died.
Pay attention to the psychic visions, the flashes reveal a secret in each of the portraits. You should notice that they each change slightly to reveal a letter in sign language. This is where the guide to sign language will come in handy to help you decipher it.
You should be able to decode the message as "poison". It seems Elizabeth seems to have shown you her cause of death, she was poisoned. You don't want to forget what you've learnt so far, so you pick up a menu and write 'Elizabeth Hadley, poisoned' on it. This will remain in your inventory and will be useful later.
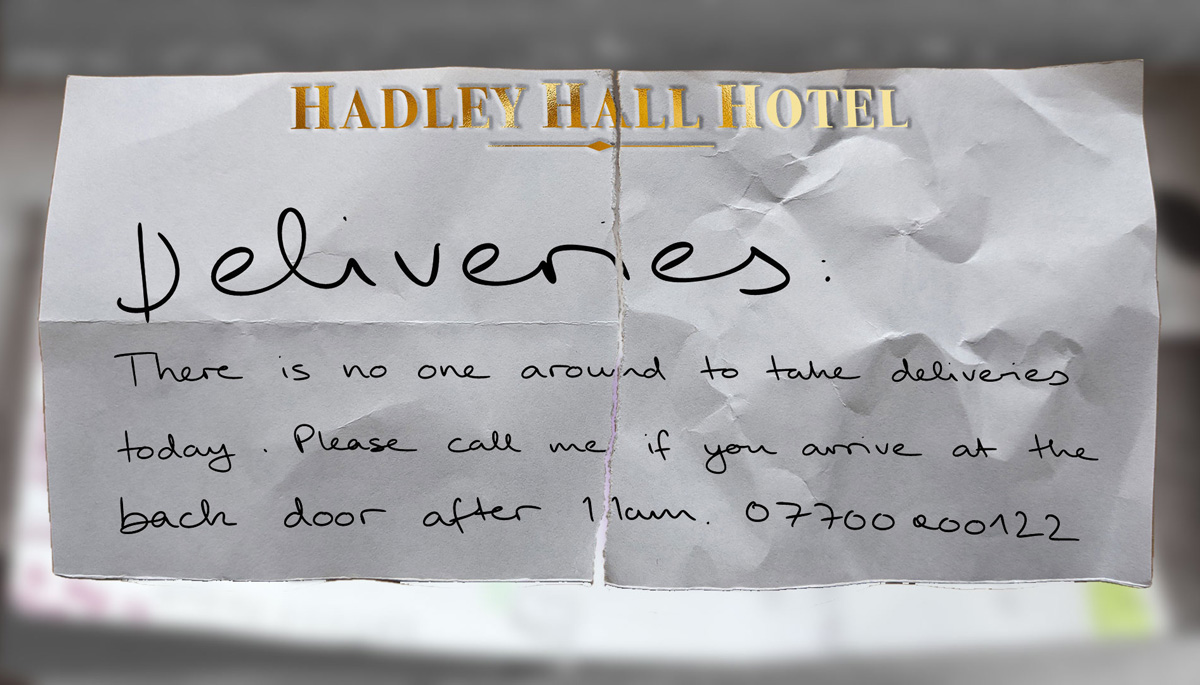
No sooner had you thrown it in your kit bag, you hear a noise coming from a guest room upstairs, you'll need a room key from reception to investigate it.
Reception Desk
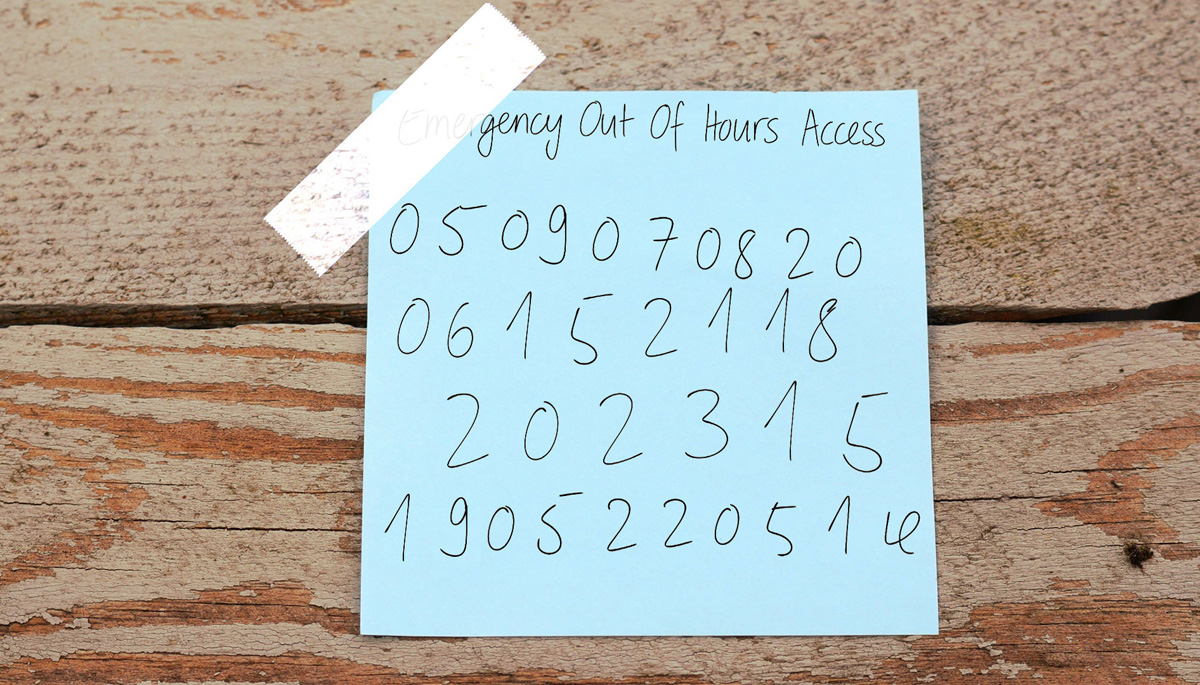
You head back to reception, where you have an uneasy feeling. Did you leave that lamp on or has someone else been here? You push the thought to the back of your head as you realise the key safe is locked and you need a four digit combination to open it. The notes on the front desk might help.
The strings of numbers on the note spells out four words that will give you the combination for the lock. The numbers should be deciphered in pairs and remember, 1 equals A, 2 equals B etc.
05/09/07/08/20 = E/I/G/H/T
06/15/21/18 = F/O/U/R
20/23/15 = T/W/O
19/05/22/05/14 = S/E/V/E/N
This tells us that the combination for the key safe is 8427.
Key safe
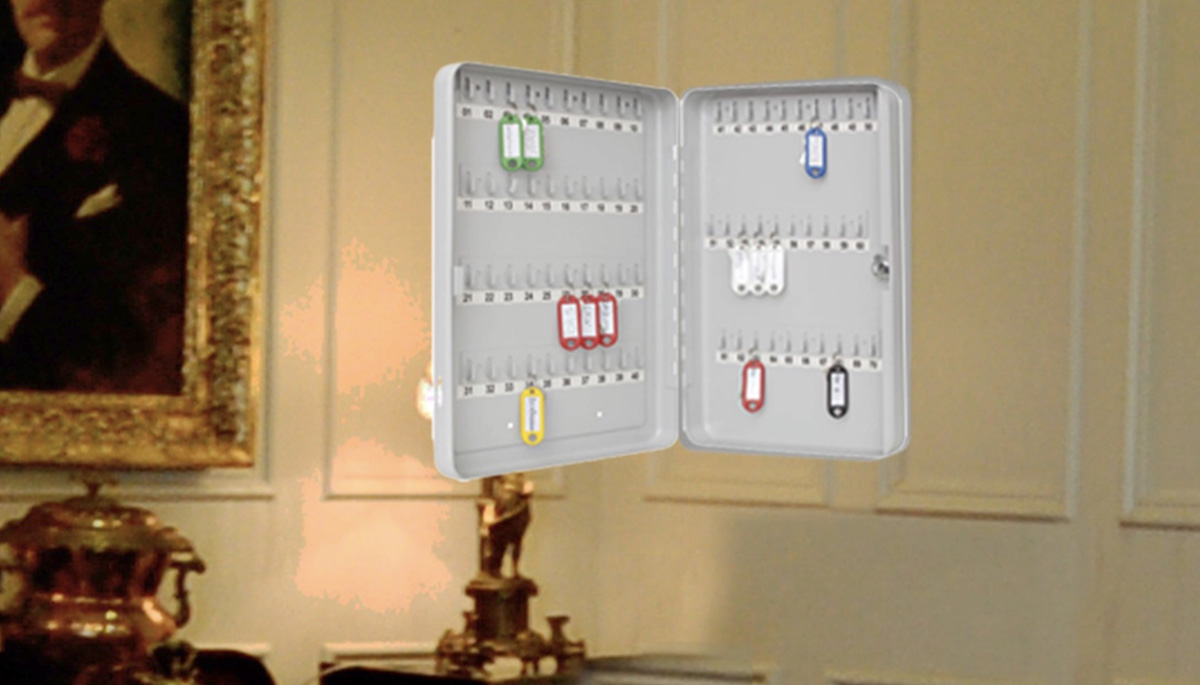
You open the key safe, but you have no idea which room key you need. You need to find the three digit room number.
A light next to the key safe is flickering. This light provides a sign from Elizabeth that you'll be counting on.
You simply need to count the flashes. After a long pause there the light flicks off once giving you 1. There is then a short pause and the light flicks off five times. After a final short pause the light turned off nine times.
This gives you the room number. Elizabeth's guiding light is leading you towards room 159 on the upper floor of the hotel, but the game tells you to keep keep your eyes peeled as she may be trying to show you something along the way.
Hallway

There's nothing creepier than a long dark corridor... apart from when the picture frames on the wall start rattling as you pass. Your attention is drawn to a newspaper cutting about the hall's role during the Second World War. Hanging next to the old newspaper cutting is an old black and white photo with what looks like servicemen posing for a photograph outside the hall. Carefully taking the frame from the wall, you turn it over to reveal a list of the names of the men in the photo.
There's no puzzle to complete here but you do collect the list of name on the back of the photo frame, which will come in handy soon.
Room 159
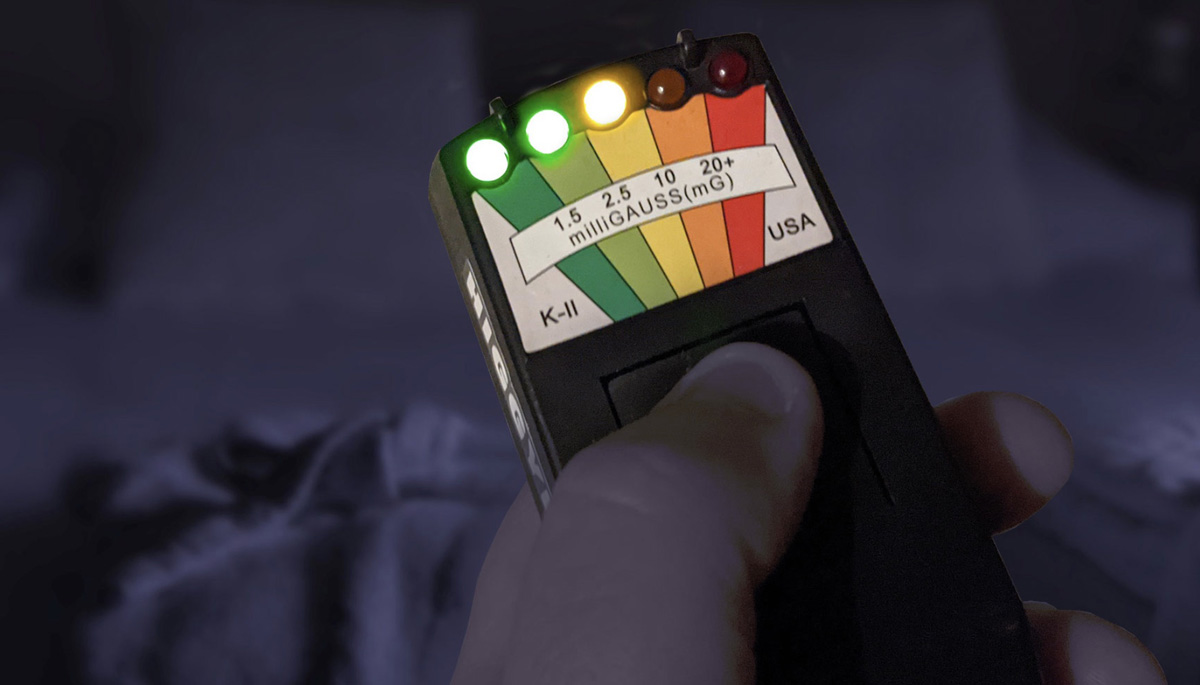
There's a sinister feel to this room, as if someone negative stayed regularly in this room and their stale residual energy is lingering. You suspect it could have been connected to the death of Elizabeth, but you need to find the name of the person who stayed here. Try calling out some names to see if you can get a hit on your ghost hunting gadgets.
This is the first puzzle in the game that requires you to actually call out to the spirits of the hall. Your browser is listening to you and once you say the right name you can proceed.
This is where that list of names comes in handy. It's just a case of reading each one out loud and looking for a response on your ghost hunting gadget when you get the correct name, which is the fourth one on the list, Robert Salmon.
Your K-II meter flashed twice indicating 'yes' in response to you saying the name Robert Salmon, an army captain listed in the photograph from the hallway. He must have stayed in this room while he was stationed here during the Second World War. It seems Elizabeth is telling you that he was responsible for her death. As you think about this revelation you hear the crash of pots and pans coming from the kitchen below. Is someone else in the hotel with you?
The Kitchen
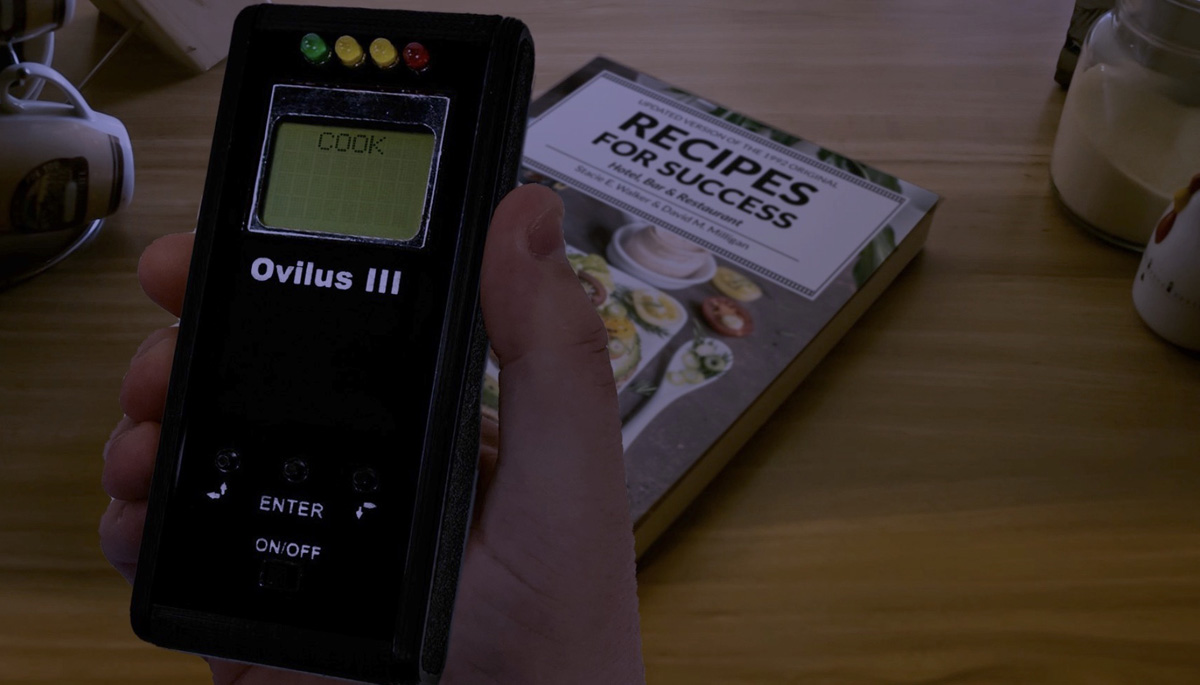
A big industrial kitchen always feels creepy when it's devoid of the normal hustle and bustle of the kitchen staff, at night it feels even more unsettling. You don't want to hang around here too long so you pull another ghost hunting tool out of your kit bag. This clever device senses changes in the atmosphere and allows spirits to communicate words. Straight away you get the word "cook," which must relate to the recipe book. But cook what?
The blinking on your ghost hunting gadget is signalling what you need to cook. It's guiding you to a menu item. Luckily you have a mean in your kit bag.
The light flashes once, then two times, then four times, then nine times. This gives you 1249, or 12.49, which is the cost of the salmon on the menu. Type in Salmon.
You could have guessed Salmon is the correct answer as you already know about Captain Salmon's involvement in Elizabeth's death, so how does this help you? You tear the page out of the book and decide to get out of the creepy kitchen. You also notice that alongside the cookery book there's a book on demonology, you grab that too and put both in your kit bag, both will be needed later, but you discard the menu.
Advertisement ‐ Content Continues Below.
The Library
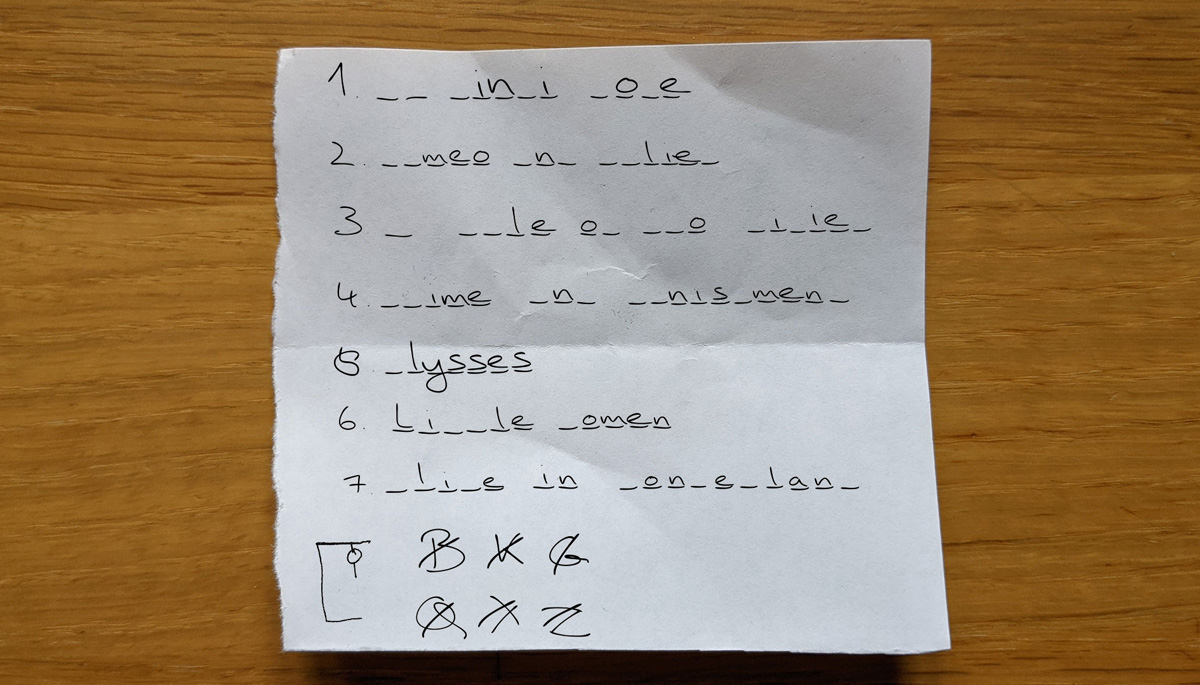
You're glad to be out of the kitchen and find yourself in a small library which feels much more inviting. You're just thinking it's a shame you can't investigate here for a bit when you notice a torn compliments slip on the floor. There is some writing on the front and what looks like clues leading you to a specific book on the back.
This puzzle tests your knowledge of classic books. The seven incomplete book titles give you the name of one famous book. You can narrow down the words with the help of the hangman style clue. You know none of the titles contain the letters B, K, G, Q, Z or Z.
The seven book titles you are looking for are:
1. Da Vinci Code
1. Da Vinci Code
2. Romeo and Juliet
3. A Tale of Two Cities
4. Crime and Punishment
5. Ulysses
6. Little Women
7. Alice In Wonderland
3. A Tale of Two Cities
4. Crime and Punishment
5. Ulysses
6. Little Women
7. Alice In Wonderland
Once you've correctly worked out the list of books, a glance down the left hand margin of the slip of paper gives you the book title 'Dracula'. Finding the book on the third shelf you reach for it and pull out, but to your surprise the whole bookcase swings open revealing a secret door and steps going down into the darkness.
You descend into the darkness taking the half of the compliments slip with you as this will be useful later.
The Communications Bunker
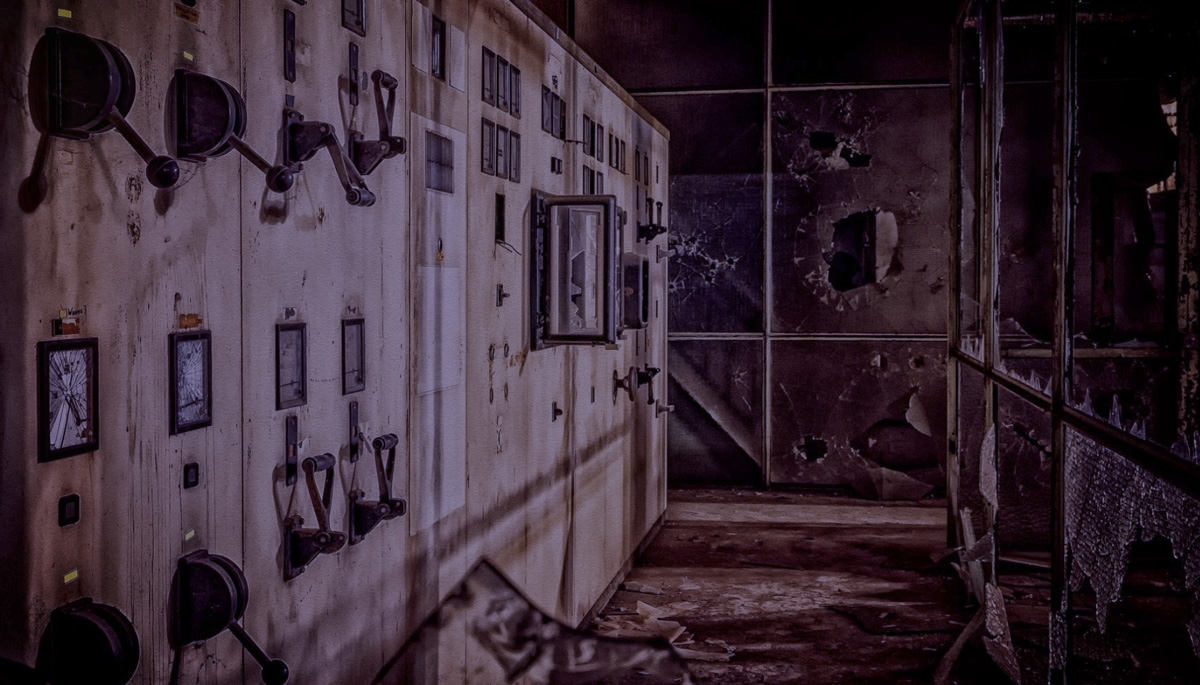
This isn't what you'd expect to find in a luxury hotel, but it seems you've uncovered the forgotten World War II secrets of Hadley Hall. The bunker is full of dusty outdated communications and radio equipment, as well as a large map on the wall of the South of England. This must be where Captain Salmon was stationed during his time at the hall. As you look around you notice something odd about the stone floor.
There's no puzzle to solve here, this is just setting the scene for your next challenge when you examine the odd stone floor.
The Bunker's Floor
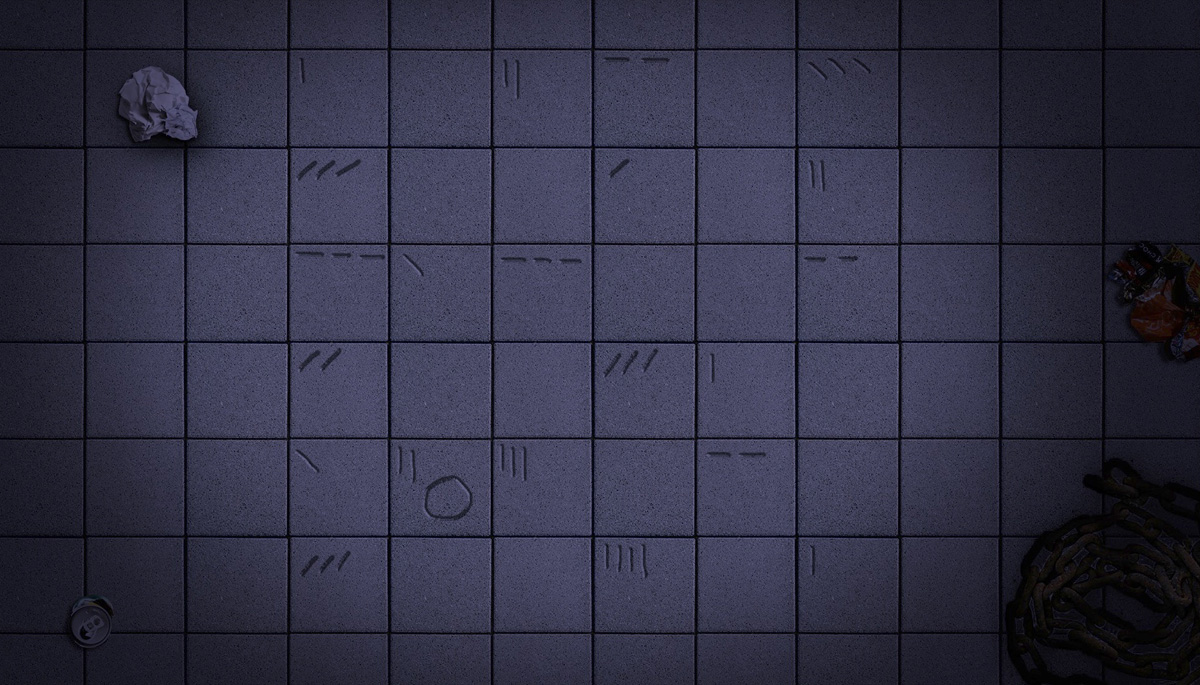
It looks like some of the stone floor tiles have been prised up, there could be some clues as to what happened to Elizabeth hidden underneath. The odd markings on the stones, which form a numbered grid, might give you an idea which stone you should check under.
The aim of the puzzle is to identify the correct stone tile to look under. A key to the floor-based game tells you that you should start on the square with a circle on it.
The key also tells us that a vertical line is north (up), a horizontal line is south (down), a forward slash is east (right) and a back slash is west (left).
Since the starting stone with the circle on it also has two vertical lines on it, we should move two space up. We land on another stone and are told to move one space to the left.
Keep following this method of moving until you land on an empty square. You should find yourself on the square numbers E5. Enter this coordinate and then lift the stone tile to find a very old looking metal strong box buried beneath it.
Salmon's Strong Box
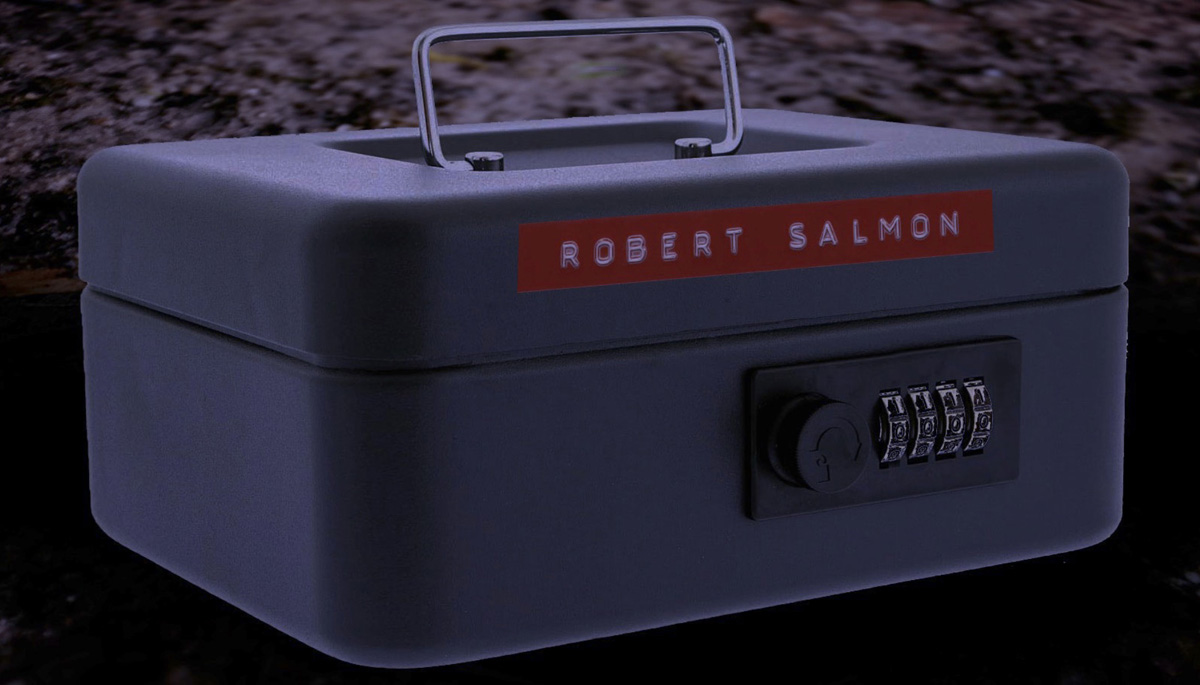
The old box has a name on it, Robert Salmon. The box is securely locked, but there's a four digit combination lock. It seems unlikely that Elizabeth would have guided you this far if you didn't already have the combination.
Check your kit bag for an item that might related to Captain Salmon, then look for a four digit code hidden within that item.
You should notice that the page torn out of the cook book is what you need. The page is titled 'Salmon', which is your first clue. Further down the page there are four prominent numbers amongst the ingredients.
These numbers are 4128, which is of course the combination you need to enter for the box, but this is odd. Why would a World War II box be locked with a code from a cookery book published in 1992? ...unless the box had been opened recently.
Confession
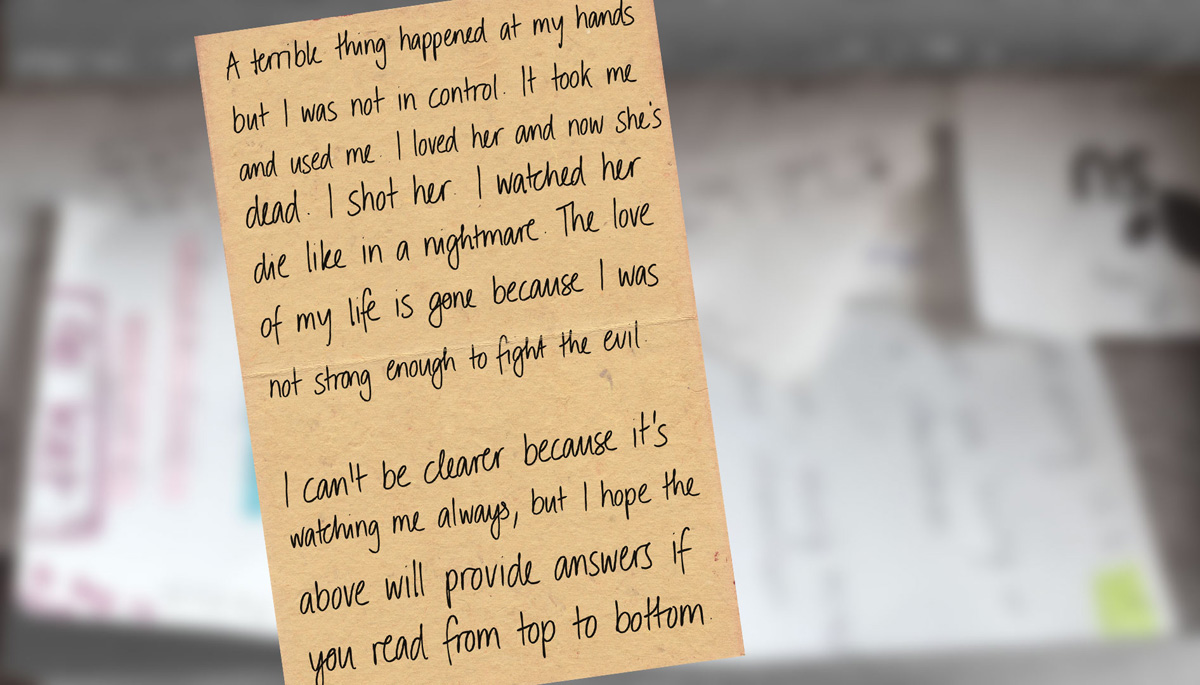
Most of the items in the box seem to belong to Captain Salmon, most notably a suicide note in which he hints at acting as if not in control of his own body. This suicide note will be useful later so you put it in your inventory.
There's something else in the box, something out of place... one of the hotel's compliments slips that's been torn in half, it fits perfectly with the other half you found in the library. So someone had been down here recently and they knew about Elizabeth's fate.
Luckily, there are some unique identifying details written on the compliments slip, you may be able to match these with a member of staff.
This is of course the phone number, which ties in with something you were given right at the start of the game, this list of the hotel staff and their contact numbers. Examine this note and you should find that the note on the compliments slip has been written by the hotel's chef, Mark Ryder.
You then look around the rest of the room, a big metal door grabs your attention and you head through.
Séance Room
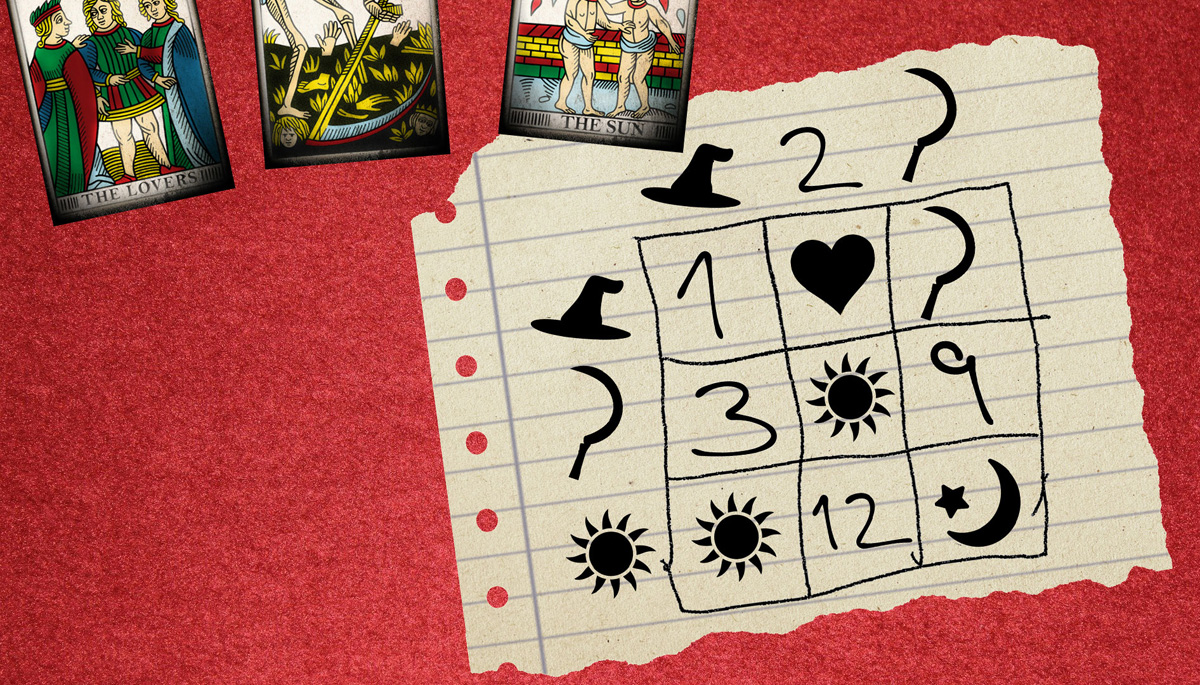
You find yourself in a softly lit Victorian séance room, photos of the Hadley family indicate that this room was once used by them. This explains what happened to Captain Salmon. The Hadleys must have conjured a demon during their sessions here and it latched on to Salmon and used his body for evil. In the middle of the table is a very old looking book of occult rituals. Three tarot cards are laid out in a very specific order. You have a hunch that this relates to a page in the book, luckily there's another clue on hand.
This is one of the trickier puzzles in the game it requires you to work out a number associated with the three tarot cards: the lovers (heart), death (sickle) and the Sun (sun).
You need to use the accompanying grid to work out the value of each of these symbols. The value in each square can be calculated by multiplying the corresponding values to the grid's key. For example the top left square equals 1, which means it is the sum of 1x1, so the magician's hat must equal 1.
This means our first card, the Lovers represented by a heart equals two, because it is 2 x 1 (a magician's hat). Similarly, 1 x the sickle equals 3. We can work out that the sun symbol equals 6 because the grid tells us that 2x the sun equals 12.
So this gives us the number, in the order the cards are displayed: 236. This allows you to correctly solved Ryder's cryptic tarot clue and now you can open the book and find out what he's been up to.
Occult Rituals
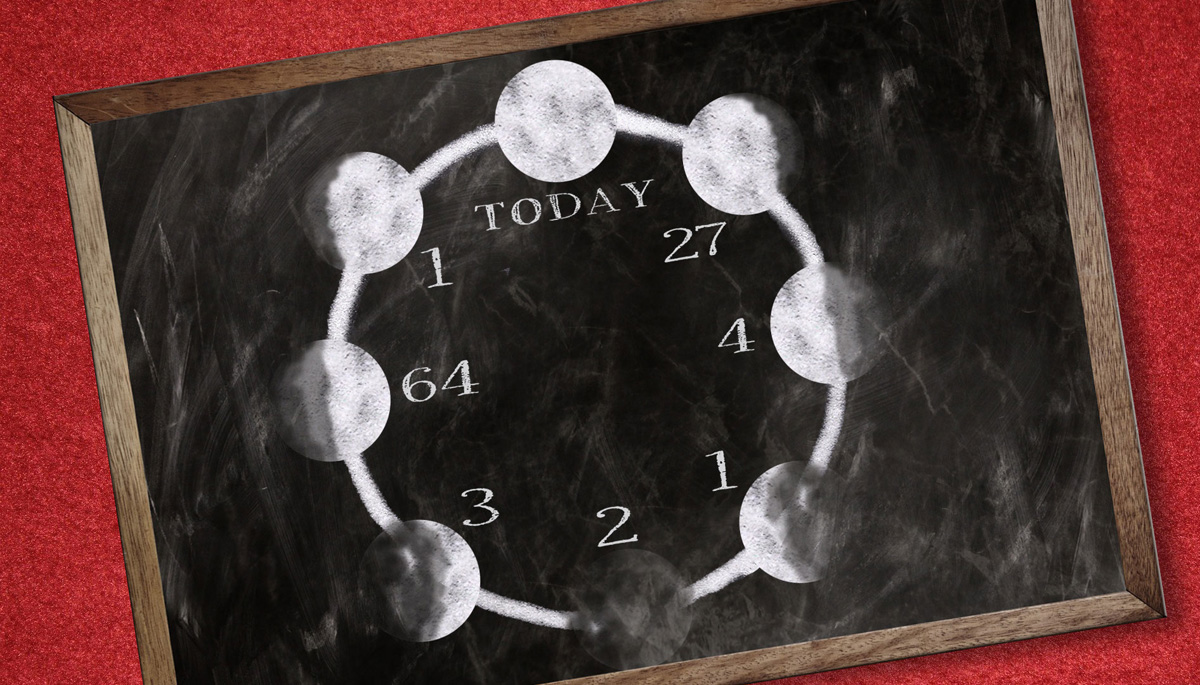
The book opens on a success ritual, this is what Ryder has been doing. He's made a pact with a demon in order to bring the hotel success, that's how he miraculously pulled the hotel back from the brink of closure. That means he's made contact with the same demon that began the chain of events that lead to Elizabeth and Captain Salmon's death. Ryder could be in trouble. You will need to call on a greater demon to help banish the lesser demon that's infesting Hadley Hall, but which one depends on the current moon phase, you check a chart on the wall to help you.
This is another maths puzzle that requires you to determine the value of 'today.' It might not be apparent at first glance, but the opposite values on the chart are cubes and cube roots. For example 4 is opposite 64 and 4x4x4 = 64.
So, you're looking for the corresponding value for the number 2, which you can work out by calculating 2x2x2. The answer is 8, but this is only half the challenge. You still need to find which greater demon to call upon.
You can do this by comparing the moon phase-ordered number with the list of greater demons in the demonology book you picked up. The overall solution to this puzzle is Malphas. That name will come in handy when it's time to banish the demon haunting the hotel. Suddenly you hear a door slam in the control room, so you go to investigate.
Communications Bunker Map Wall
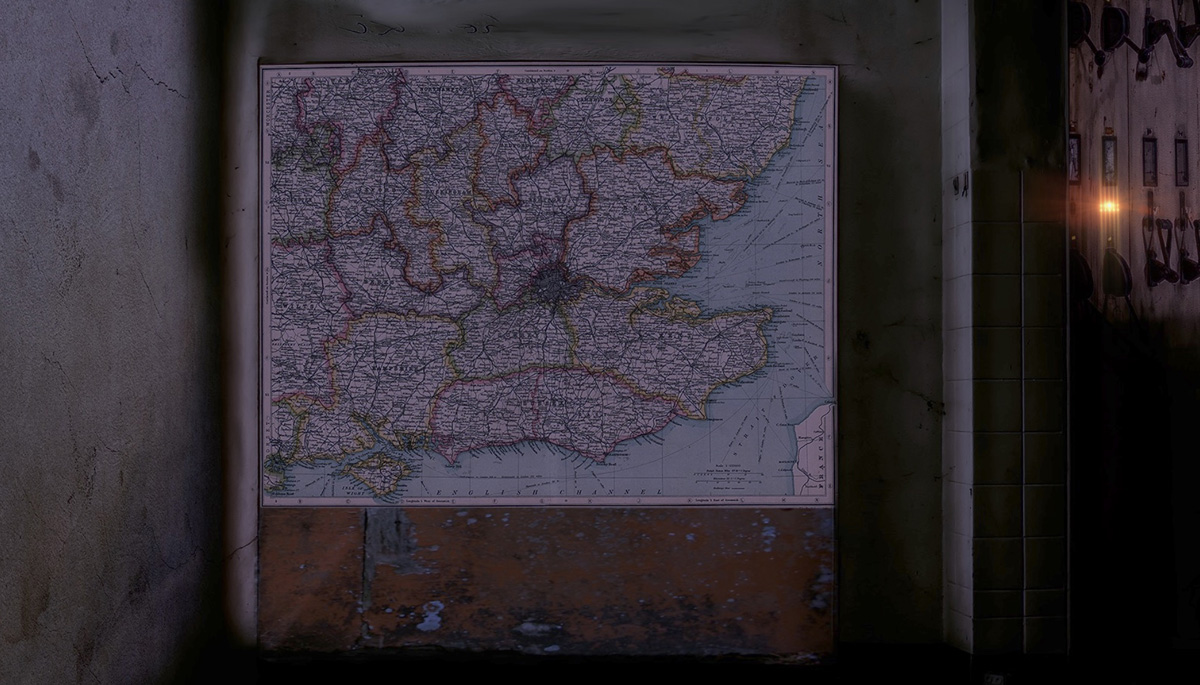
You walk back into the main room of the bunker, but the room is empty. Whatever caused the door to slam is gone now, then you realise... there are no doors other than the open doorway you just walked through. Something is different though. One of the old pieces of communications equipment seems to have switched itself on.
To solve this puzzle you need to listen carefully for the clue. A sheet to decipher morse code should also give you a strong hint what you are listening out for.
A repeating morse code signal is spelling out a place name, Woking. Clearly this relates to the huge map on the wall. You find Woking and push on it, to your surprise the section of the map pushed back into the wall revealing a disguised handle to a secret door. It seems the whole map swings open.
Banishing
The sudden gut-wrenching realisation of what caused the slamming door sound you heard hits you. It was the map closing because someone had hidden inside. It was Mark Ryder. Now he's stood in front of you pointing Salmon's service revolver in your face. The wild look in Ryder's eyes tell you that he is a victim of demonic possession.
You need to move this demon on by calling upon Malphas. You read a ritual from the demonology book, but to complete the ritual you need to name the demon holding Ryder to drive it away, but what is the demon's name? Perhaps Captain Salmon left you a clue as the same demon tormented him.
Since Captain Salmon's suicide note was a cry for help, he may have hidden the demon's name in the note. You should be able to cross reference the name with the list of lesser demons in the demonology book.
Salmon's note ends by saying "I hope the above will provide answers if you read top to bottom." He's telling us to read the first letter of each word, which spells out the name Abaddon. A quick check of the list of lesser demons in the demonology book will confirm this name.
This is another spoken answer. You need to shout out the demons name to banish it.
As soon as you say the name Abaddon, Ryder shakes and the vacant look leaves his face. The gun he's holding drops to the ground and the demon is banished, returning to the infernal realm. With the threat removed you look around the secret chamber behind the map. It is a small room with nothing inside other than two skeletons. It seems Captain Salmon brought Elizabeth's body here and locked himself in with her, before taking his own life. A bullet hole through one of the skulls indicates his cause of death.
Sunrise
With the mystery solved, you can now escape from the hotel.
As the sunrises over Hadley Hall, you feel a sense of relief. Now that Elizabeth's body has been found and the evil entity with a hold over her has been moved on, she is free to pass over.
Finally the guests of Hadley Hall can have a peaceful night's sleep, minus the bumps in the night.
If you're feeling brave enough to grab your ghost hunting tools and enter this eerie online escape game, you can play now at hauntedescape.co.uk.
Learn With Higgypop
Hosted by Paralearning in association with Higgypop, these courses on ghost hunting, paranormal investigations, and occult practices draw on the experience of our team of paranormal writers.
Diploma In Advanced Scientific Theory For Paranormal Investigators
This course gives you practical and useful knowledge of ghost hunting and paranormal research, which is invaluable when conducting your own paranormal investigations or as part of a group event.
View Course
Diploma In Capturing & Analyzing Electronic Voice Phenomenon
This course gives you practical and useful knowledge of ghost hunting and paranormal research, which is invaluable when conducting your own paranormal investigations or as part of a group event.
View CourseMore Like This
PhasmophobiaJune 06, 2025
'Phasmophobia' Movie Announced As Hit Ghost Hunting Game Heads To The Big Screen
ParanormalSeptember 06, 2023
'Incubus': The New Ghost Hunting Game That Blends Reality & Fiction
ParanormalOctober 09, 2022
'Incubus' The New Game From Darkling Room Puts You In A Real Haunted House

GamingSeptember 20, 2022

Comments
Want To Join The Conversation?
Sign in or create an account to leave a comment.
Sign In
Create Account
Account Settings
Be the first to comment.